Hello there! As a seasoned builder specializing in bathroom renovations, I’ve mixed more concrete than I can count. That’s precisely why I’m here today, to assist you in selecting and blending the ideal concrete for your shower pans.
Before we dive in, here’s a little builder humor to lighten the mood: What do you get if you cross a chicken with a cement mixer? A brick-layer!
Now, let’s roll up our sleeves and get down to the nitty-gritty of concrete mixes. In this comprehensive post, we’ll explore everything you need to know about selecting the right concrete mix for your shower pans, and I’ll walk you through the process step-by-step.
So, whether you’re a seasoned DIY enthusiast or a first-time renovator, stick with me, and we’ll lay the foundation for a successful project together. Let’s get started!
Before you Start!
A shower pan is the foundation of your shower. It’s the base that catches and directs water to the drain, preventing leaks and water damage. The right concrete mix is crucial for a durable, long-lasting shower pan.
But with so many options available, how do you choose the right one? This guide will help you navigate the world of concrete mixes and find the perfect one for your shower pan.
Quikrete Floor Mud: A Builder’s Choice
When it comes to constructing shower pans, Quikrete Floor Mud is a popular choice among builders. This pre-blended, Portland cement-based dry material is designed for deep fills and leveling of concrete, making it perfect for shower pans.
The Quikrete Floor Mud is a user-friendly, durable product that ensures a smooth, level surface. To utilize it effectively, start by preparing the area.
This involves clearing the shower pan area of any dirt, dust, or loose particles to ensure optimal adherence to the floor mud. Next, follow the manufacturer’s recommendations for the correct water-to-mix ratio.
Add the specified amount of water to the Quikrete Floor Mud in a large bucket or wheelbarrow. This will ensure the mixture is consistent and easy to apply.
Finally, using a trowel, evenly distribute the floor mud over the shower pan area. Ensure the application is smooth for the best results.
This process, while simple, can significantly enhance the quality and longevity of your shower pan. Finally, allow the floor mud to cure for at least 24 hours before walking on it or applying any additional layers.
Quikrete Sand/Topping Mix: A Versatile Option
The Quikrete Sand/Topping Mix is an excellent choice for shower pan applications, particularly when a thickness of less than 2 inches is required. This pre-blended mixture of cementitious materials and sand is designed for such specific applications.
Before using it, make sure to thoroughly clean the shower pan area. This will ensure optimal adherence of the Sand/Topping Mix to the surface.
Next, adhere to the manufacturer’s recommendations for the correct water-to-mix ratio. Combine the Sand/Topping Mix and the specified amount of water in a large bucket or wheelbarrow.
This will create a consistent mixture that is easy to apply. Finally, using a trowel, apply the mixture to the shower pan area.
Be sure to spread it evenly and smoothly for the best results. This simple process can significantly improve the quality and durability of your shower pan.
DIY Concrete Shower Pan Mix: A Custom Approach
For those who prefer a more hands-on, custom approach, creating your own concrete shower pan mix is a great option. This method gives you more control over the consistency and composition of the mix, allowing you to tailor it to your specific needs and preferences.
Recipe
Here’s a simple recipe to create your own mix:
Materials Needed:
- Portland cement
- Sand
- Water
Steps:
- Start by measuring your materials. You’ll want to combine 1 part Portland cement with 5 parts sand. This ratio will give you a mix that’s strong enough for a shower pan but still easy to work with.
- Gradually add water to your cement and sand mixture until you achieve a thick, workable consistency. The mix should be easy to spread but not so wet that it loses its shape.
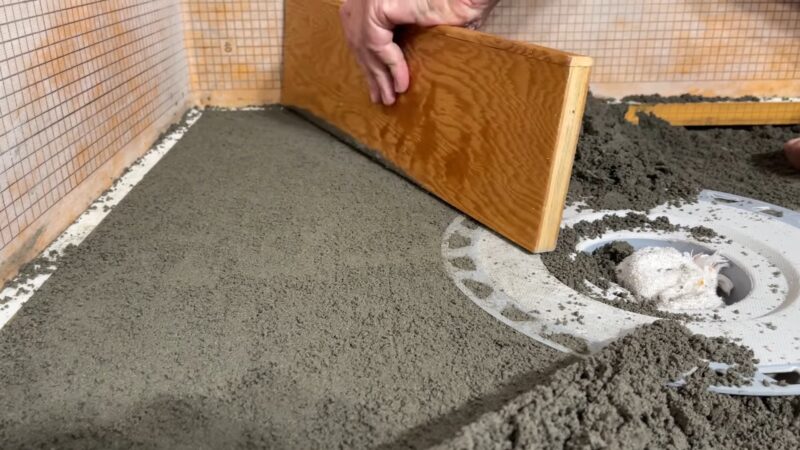
- With your mix ready, it’s time to apply it to the shower pan area. Using a trowel, spread the mix evenly and smoothly across the surface. Be sure to cover all areas, especially the corners and edges.
- The final step is to let the mix cure. This process allows the water in the mix to evaporate, causing the mix to harden into a solid, durable base for your shower pan. Allow the mix to cure for at least 24 hours before proceeding with any additional work.
By following this recipe, you can create a custom concrete shower pan mix that’s tailored to your specific needs. Remember, the key to a successful DIY project is patience and attention to detail.
Consistency Matters
Regardless of the concrete mix you choose, achieving the right consistency is crucial. The mix should be thick enough to hold its shape without slumping, but not so dry that it crumbles.
A good rule of thumb is to aim for a consistency similar to peanut butter. This will ensure the mix is easy to spread and will adhere well to the surface.
Shower Pan Mix Comparison
Here is a comparison of shower pan concrete mixes, considering their availability, size, and ease of use.
| Type of Mix | Availability | Sizes | Ease of Use |
|---|---|---|---|
| DIY Concrete Shower Pan Mix | Available anywhere that basic concrete materials can be bought | Any size you need | Medium. You have to measure the ingredients yourself |
| Quikrete Floor Mud | A little harder to find but available at flooring suppliers and Ace Hardware | 80-pound bags | Easy, it’s a pre-made mix |
| Quikrete Sand/Topping Mix | Available almost anywhere | 10-pound, 40-pound, 60-pound, and 80-pound bags | Easy, it’s a pre-made mix |
Each type of shower pan concrete mix has its own strengths and weaknesses, which suit different users’ needs and preferences. When choosing the right mix, people should think about their project’s requirements, what they want from the shower pan, and how experienced they are with working with concrete.
The decision on which mix to use depends on individual factors like the size of the project, budget, time available, and the person’s skill level.
FAQ
Can I add color or additives to the concrete mix for aesthetic purposes?
It is generally not recommended to add color or additives to the concrete mix used for shower pans. These additions may compromise the mix’s waterproofing and bonding capabilities, potentially leading to water leakage and structural problems.
How long does the concrete shower pan take to dry before I can continue with tile installation?
Drying times can vary depending on environmental conditions and the specific concrete mix used. Follow the manufacturer’s guidelines for the recommended curing time. Typically, it may take a few days to a week before the shower pan is fully cured and ready for tile installation.
Can I do a DIY shower pan installation, or should I hire a professional?
While it is possible to do a DIY shower pan installation, it can be a challenging task, especially for those without prior experience in construction. Hiring a professional can ensure proper installation, reducing the risk of leaks and water damage in the long run.
What are the signs of a poorly installed or damaged shower pan?
Signs of a poorly installed or damaged shower pan include water leaks, cracks in the tiles or grout lines, soft spots on the shower floor, and musty odors. If you notice any of these signs, it’s essential to address the issue promptly to prevent further damage to the underlying structure.
Final Words
Choosing the right concrete mix for your shower pan is crucial for a successful bathroom renovation. Whether you opt for Quikrete Floor Mud, Quikrete Sand/Topping Mix, or a DIY mix, remember that consistency is key.
With the right mix and proper application, you’ll have a durable, long-lasting shower pan that serves as a solid foundation for your shower. Remember, every renovation project is a journey.
Take your time, do your research, and don’t be afraid to ask for help if you need it. Happy renovating!